Designing a (Slightly OTT) Home Network with Ubiquiti: The Quest for Perfect, Brick-Proof Connectivity
Me and Abi have been saving for a deposit to buy our first home and with that comes the inevitable updates from various home search sites with properties that may be of interest. It’s a bit of a dream, isn’t it? Scrolling through Rightmove and imagining where the sofa will go, or more importantly, where the server rack will go (I know, I’m a romantic).
We got an email through letting us know about a property slightly down the street from where we are now and, as our current home is perfect for town, seeing family, and everything else life seems to throw at us, it seemed like a good opportunity to do a bit of investigating. The house itself needs a bit of work to bring it into modern times—a bit of rewiring, some plastering, maybe a kitchen update—and we’re certainly not scared of getting our hands dirty (though I fully expect my back to be less enthusiastic than my brain about that, come moving day).
But, between you and me, the real excitement started when I began thinking about the infrastructure.
The house hunting got me thinking, as one of the things Abi has somewhat agreed to (read: hasn’t said yes but also, most importantly hasn’t said no, which in my book is somewhat of a green light.. Maybe an amber light?) is allowing me to add wired networking throughout any property we buy. Honestly, I have a bit of an aversion to Wi-Fi when it comes to my own devices. It’s like a temperamental teenager, or a couple of tiny terrors; sometimes it’s great, but other times you’re left shouting at it from the next room, and it just refuses to work. There’s always something blocking a signal here or there. I shouldn’t have to hope my Mobile Data works when I’m sat on the loo because the Wi-Fi signal reaches the bathroom door and gives up. We all know that moment of digital despair, right? You’re trying to catch up on a podcast, and the little spinning wheel of doom appears? That’s my personal nightmare.
Having a wired network throughout the house also has the benefit of firstly, future-proofing the property (we’re talking decades here, folks, not just years!), but also allowing me to finally have a mini server rack in my office and a proper network cabinet tucked under the stairs or maybe in an old disused airing cupboard. Our smart TV will not have issues playing back content from our local media server due to a dodgy Wi-Fi signal… or at least that is my outlook on things. I want the experience to be as smooth as a freshly rendered 3D model, not a stuttering mess.
Phase 1: Planning, Pixels, and Plenty of Panic
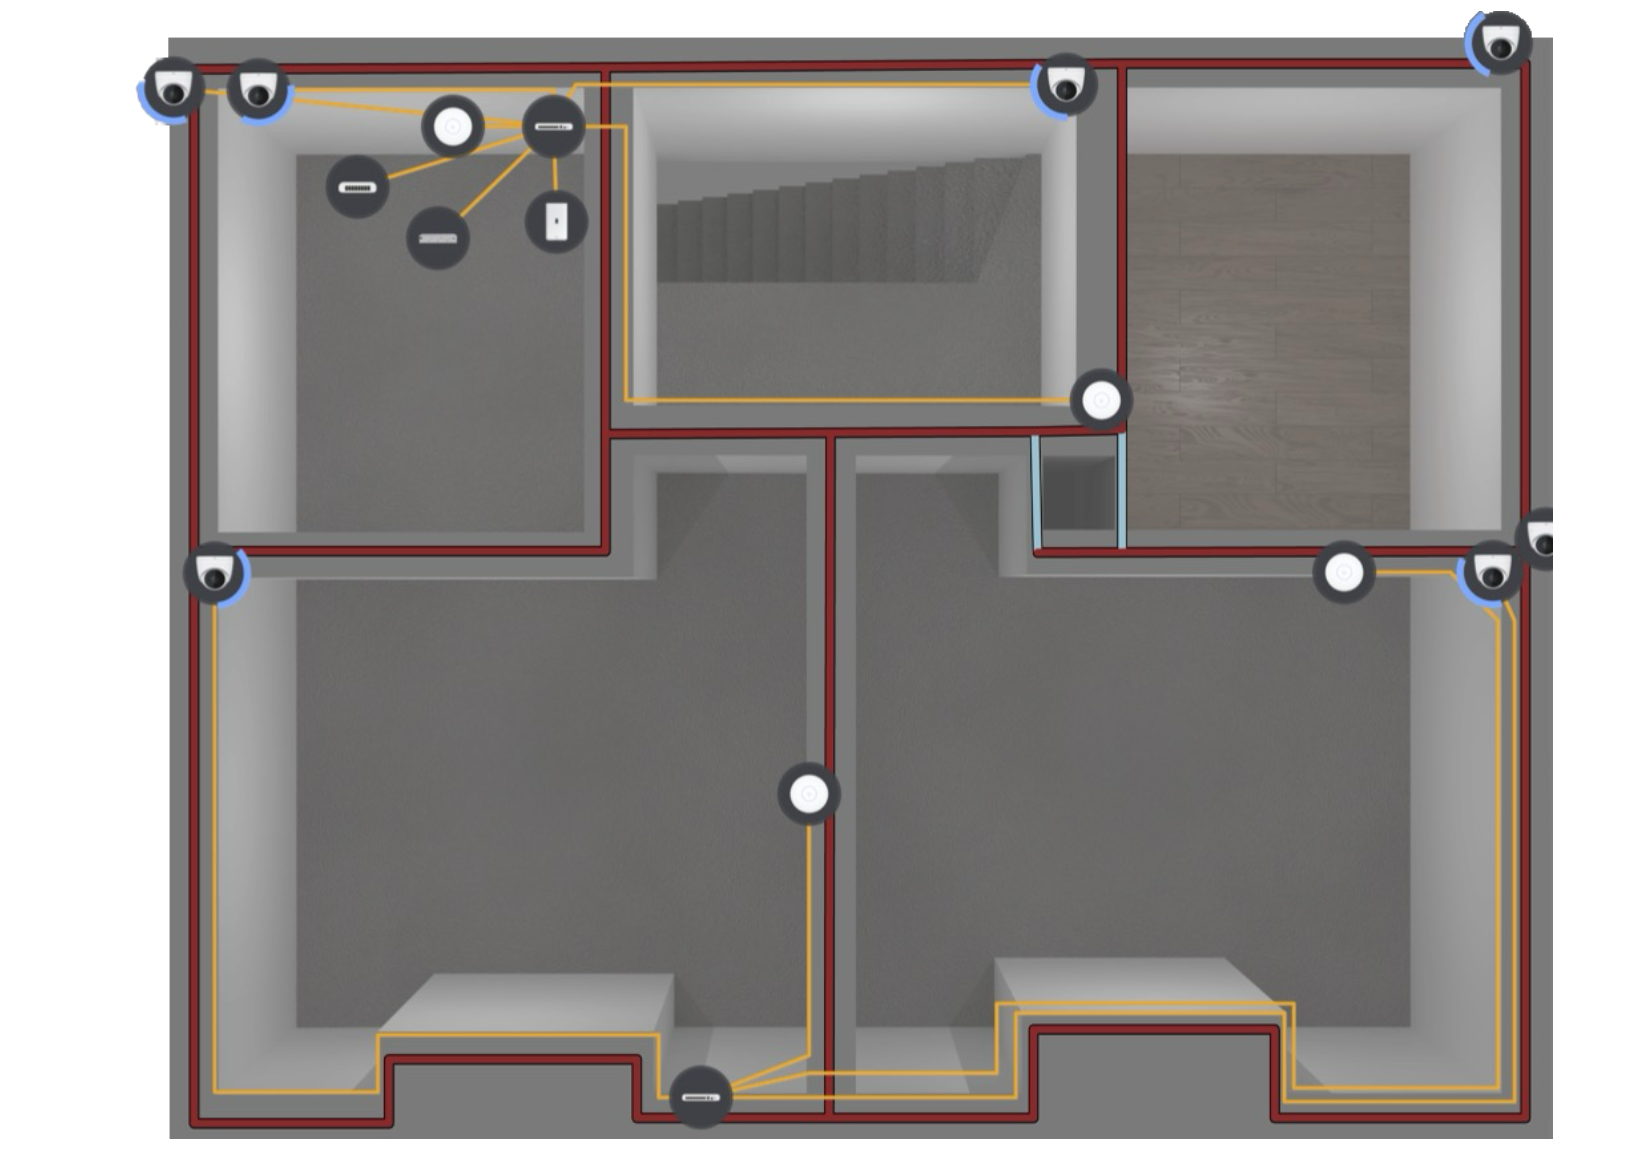
So, to get back on track a bit, when we had a look at the listing for the property, the agents had handily included a floor plan and, somewhat, accurate measurements. This is where my obsession kicks in. I did what I always do when I see a possible project in my future: I got Blender up and running and created a detailed 3D model of the house.
Now, you might be thinking, “Jim, isn’t a 2D floorplan enough?” And technically, yes, but where is the fun in that? Building the 3D model lets me visualise the space properly, figure out line-of-sight for Wi-Fi (the irony is not lost on me), and, most critically, map out exactly where the cables are going. When you’re dealing with properties where every internal wall is thick, dense brick—the kind of brick that seems designed by engineers purely to thwart Wi-Fi signals—you need to know if that 30-50mm wall is going to cause a problem. Plus, creating a digital twin means I can virtually rip out walls and relocate sockets before I even buy the first tin of paint. It’s truly pure gold for my high-functioning planning anxiety.
Whilst we don’t own the house and have a year or so to go until our savings match what we need for a deposit, the exercise has been great for allowing us to figure out what we would do with a similar space in the area (most of the houses are laid out similarly, except the odd one here and there, including our current home, that are different due to their size).
The Conduit Conundrum (Or, Why Cable Matters)
Once the 3D model was built and out of the way, it was time to talk cable. If we are going to be tearing up floorboards and chasing walls (which is necessary in a house this age), we need to ensure the stuff we put inside the walls won’t need replacing for another twenty years. We’re not just running basic Cat5e, are we? That’d be madness. We need to run Cat6a—and possibly some Cat7 just to be extra safe— and even Fibre-Optic cable, everywhere.
The crucial part here is conduit. You run the conduit, and then you pull the cable through. This is the difference between a one-time renovation pain and a lifelong nightmare. Why? Because if Cat6a’s 10 Gigabit Ethernet (10GbE) is replaced by, say, 25GbE or 40GbE in the next decade (and trust me, it’s coming), I only need to pull the new cable through the existing tubes. Also by making the main backbone of the network with fibre for the fibre run all we should need to do is upgrade the SPF+ to the latest standard saving us a bit of work in the long run and we will only need to replace the short run of copper ethernet sable if (or more likely when) the time comes.
Anecdote time: My first ever attempt at a proper home network involved stapling a beige Cat5 cable to the skirting board in the hallway. It looked terrible, and when I tried to upgrade it years later, I accidentally stapled the new cable to the old cable’s jacket. Total disaster. Never again. Now, it’s all about smooth, subterranean, future-proof pathways.
Phase 2: The 10GbE Backbone – Our Digital Motorway
With the virtual house built, and a mountain of theoretical Cat6a cable measured out, it was time to head over to uk.store.ui.com and see what the team over at Ubiquiti had to offer. I love Ubiquiti (or UniFi, as their ecosystem is called) because it gives you enterprise-level control without the enterprise-level complexity or, frankly, the enterprise-level price tag. It’s the perfect blend of nerdy features and consumer accessibility.
1. The Internet Gatekeeper: Cloud Gateway Fiber (£387.60)
The first thing to consider was getting the internet from the outside and into the property. Thankfully, the full street has fibre to the home using both any Openreach provider as well as KCom (a local firm that originally were the only supplier in Hull, and they have branched out since to cover more of the local area).
Now, as I don’t want to be limited by converting the fibre to Ethernet straight off the bat and chucking a load of potential bandwidth out of the window if we upgrade to a super-fast internet provider in the future, I needed a proper high-speed gateway. I mean, we might only be on 1Gbps now, but what if a 10Gbps residential connection drops next year? Okay maybe not next year but I don’t want to replace my core router when it happens!
That’s when I came across the Cloud Gateway Fiber (£387.60). It’s a desktop 10G Cloud Gateway with an integrated 4-port 2.5 GbE switch, a separate 10G SFP+ port to go out to the network, selectable NVR storage (none, 1TB or 2TB), and full UniFi application support, giving me access to:
- UniFi Network: The core brain, managing everything, providing real-time traffic insights and a visual network topology. I love a good visual topology; it lets me see if everything is happy at a glance.
- UniFi Protect: The constantly evolving, AI-driven camera platform that records high-quality video to local storage. (More on this later, but swoon.)
- UniFi Talk, UniFi Access & UniFi Connect: The more business-focused stuff, but who knows? Maybe I’ll have a smart lock and a fancy digital display one day. It’s ready for the future!
The UCG-Ultra is the ideal brain for this operation. It takes the fibre directly, handles all the routing, and gives me a 10Gbps link to the rest of the house. Crucially, it keeps my options open for those ludicrously fast ISP upgrades.
2. The 10Gbps Aggregator: UniFi Aggregation Switch (£258.00)
Now, whilst there are 4 2.5GbE Ethernet ports on the Cloud Gateway Fiber, that isn’t going to be enough to provide ample coverage for all of the house. That’d barely sort the living room! And as I still don’t want any bottlenecks, we’re going to need to get our hands on an SFP+ switch.
Think of it this way: the internet pipe is the main road coming into the city. The Cloud Gateway is the main toll booth, checking traffic. The Aggregation Switch is the main roundabout, ensuring cars can get onto the smaller, but still very fast, distribution roads (the edge switches). Every device that truly needs speed (like the NAS and the NVR) is plugged directly into this high-speed backbone. Everything else gets a 10GbE uplink to its own local switch. It’s simple, effective, and ridiculously fast.
Handily, Ubiquiti has me covered here too with their UniFi Aggregation Switch (£258.00). This little beauty is an 8-port, Layer 2 switch made for 10G SFP+ connections. This is the digital equivalent of a motorway junction. The 10Gbps connection comes out of the Cloud Gateway and hits this switch, which then splits it, still at 10Gbps, to switches or devices across the house that have an SFP+ port.
Phase 3: The Edge Switches – 2.5GbE to the People
Now we have the Aggregation Switch getting our 10GbE fibre backbone everywhere. We need to be able to turn that backbone into standard Copper Ethernet Cable that our devices can actually use.
To keep things simple, flexible, and utterly excessive, I decided to go with five UniFi Flex 2.5G PoE Switches (£190.80 each). These are the workhorses. They have both a 10G SFP+ & 10G Ethernet input (for the uplink to the Aggregation Switch) as well as 8x 2.5GbE PoE++ Ethernet ports.
Why 2.5GbE? Because it’s the current sweet spot. Regular Gigabit Ethernet (1GbE) is fine, but it’s a bottleneck if you’re moving large files around the network (like 4K video editing files or massive backups). 10GbE to every desktop is still a bit costly. 2.5GbE is fast enough for 99% of tasks, and it’s easily supported by modern laptops, desktops, and even high-end access points. The 10GbE uplink back to the Aggregation Switch acts as a huge pipe. Now, as every device plugged into each switch is not going to be capping out its 2.5GbE connection at the same time, the 10GbE link back to the aggregation should be more than enough. It’s like having eight lanes of local traffic feeding into a ten-lane motorway. We should be fine!
Now you may be wondering why five of these costly beasts… I know Abi will be when she hears my plan. It’s mainly because of the number of connections we are going to need for Wireless Access Points and Security Cameras (we’ll come on to those shortly), never mind all of the other gear we are going to need to connect over time. We’re not even thinking about additional extra runs to certain rooms (like bedrooms for Smart TVs and computers).
Let’s break down the madness of the five-switch topology:
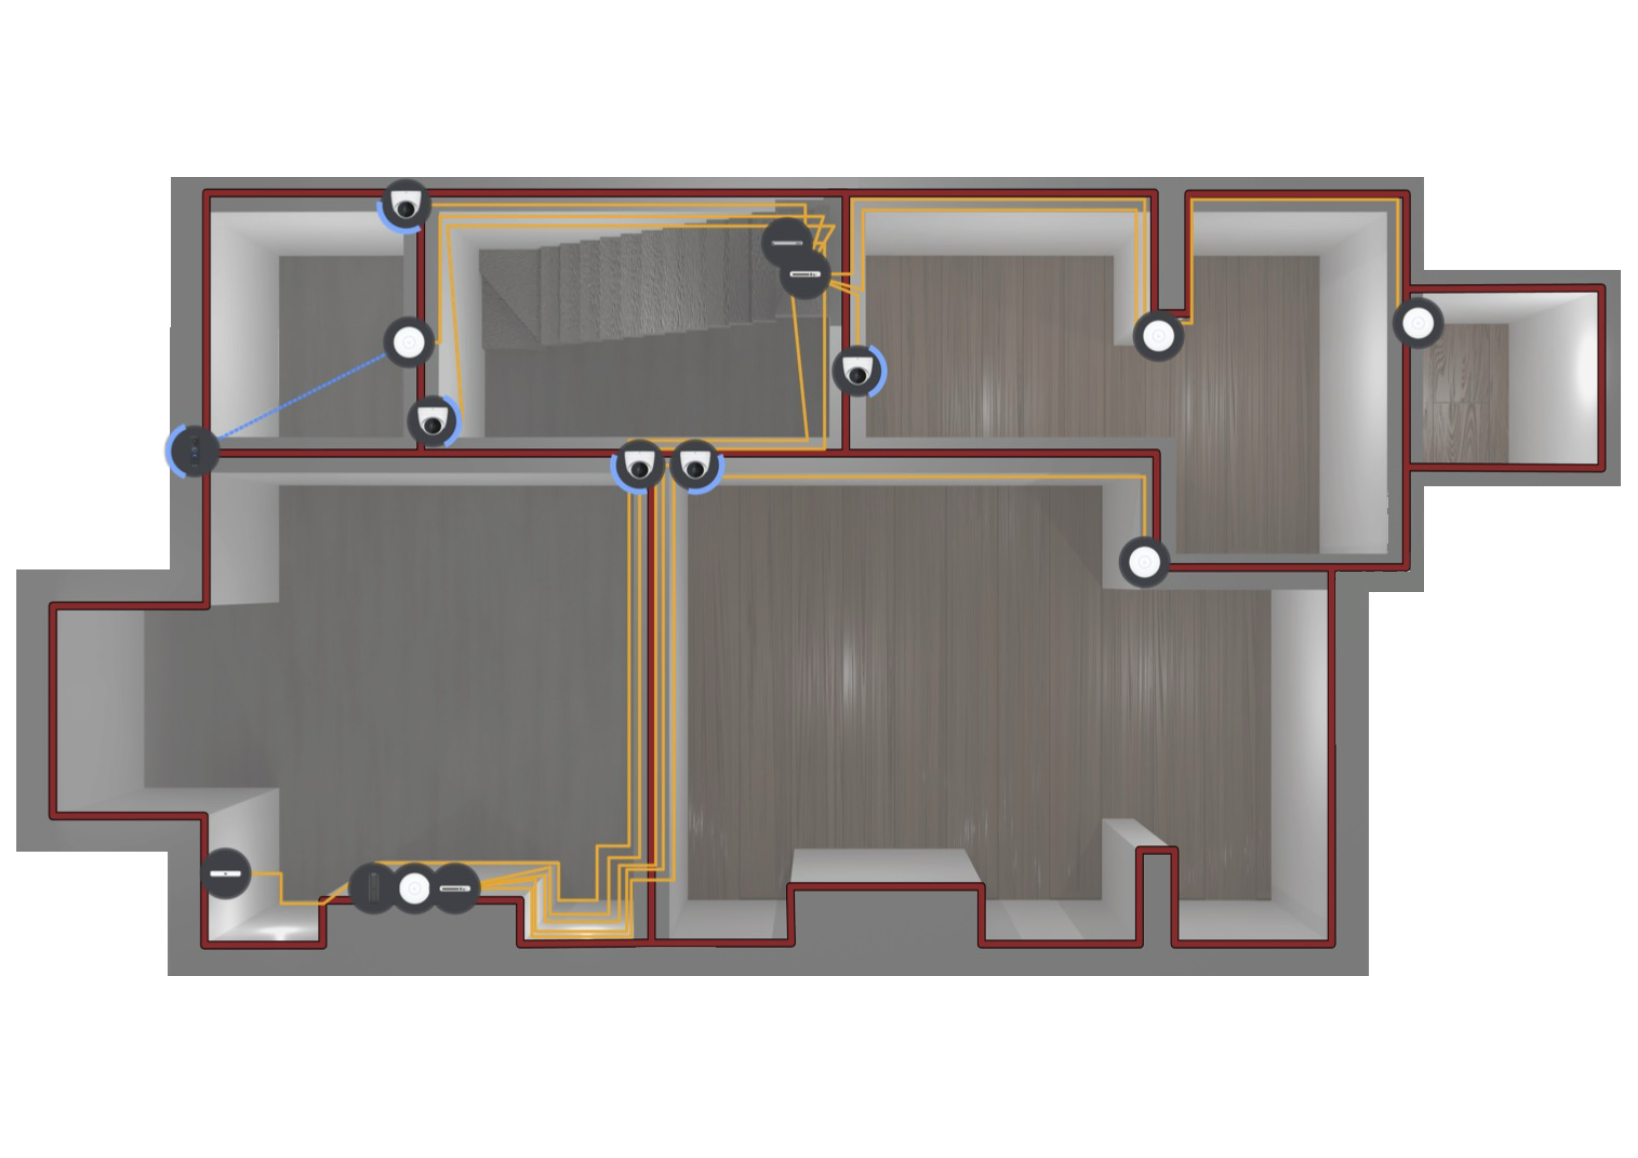
1. The Network Cupboard Switch (Under the Stairs)
This switch will be purely for the core network devices that don’t need user interaction. It’s the silent workhorse. It will handle the cables running to:
- The cameras and Wireless Access Points in the hall, kitchen, garden, lobby, and back porch.
- The outdoor garden and side of house cameras.
This is all PoE++ power delivery, meaning no messy power bricks or extra cables. It simplifies installation immeasurably, and my OCD for cable-managing is grateful for it. This switch lives under the stairs, tucked out of the way, running quietly and efficiently.
2. The Living Room Switch (The Media Hub)
This one goes behind the TV and provides the low-latency connections that are absolutely essential for any serious media consumption or gaming. It gives connectivity to:
- The Living Room and Dining room Cameras and Access Points.
- Media devices connected to the TV (Game Consoles – PS5, the inevitable Set-Top Boxes, the Smart TV itself).
- An extra spare port: For when we get around to replacing the Apple TV, hopefully that will be sorted before the move though, I really miss the buttery smooth UI and the fact that I don’t have to wait for the SoC to stop having a panic attack when I load an app.
Latency is king here. I refuse to blame my terrible Call of Duty skills on a dodgy Wi-Fi connection when a 2.5GbE wired link is right there and it is 100% the fact that I just can’t play FPS games. It’s a matter of principle, really.
3. The Bedroom Switch
This switch is all about bringing high-speed and reliable connections to the upstairs sleeping quarters (and my reading nook, which totally counts as a tech zone). It connects:
- The Two Bedrooms’ Access Points and Cameras. (Don’t worry, the beds will be privacy screened in the UniFi Protect Software, but if someone breaks into my house, I want to know where they have been! It’s security, not spying, folks, I promise.)
- Wired connections to any devices in the bedrooms (The kid’s computer when they grow up, Apple TVs in each bedroom (again when the kids grow up a bit), etc.).
- It’s generally the quietest switch, only humming to life when we decide to have a lazy night in bed watching a bit of rubbish before dropping off to sleep.
4 & 5. The Office Switches (The Double-Tap Insanity)
Lastly, we have the office where there will be two switches. Yup, two! This is the nerve centre of the entire house, where my projects live and where my brain also starts to fog over after too many hours staring at code.
Office Switch 1: Infrastructure & Backhauling This one is primarily for networking gear and the big storage items:
- Cameras and access points in the hall, office and front garden.
- The Network Attached Storage (NAS) (more on that in a moment).
- Uplinks to the rest of the house (the two switches need their own 10GbE uplink each, naturally).
Office Switch 2: My Personal Playground This is dedicated to the equipment in the office that I use every day:
- My work computer (the day job requires reliability that Wi-Fi can’t guarantee).
- My personal computer (for Tinkering with LLMs and 3D rendering).
- My Home Assistant install (the tiny little brain running our smart home automations).
- A few other things that I run on my mini home lab (virtual machines, testing environments, etc.).
As I get more into some of my projects (AI/LLMs, 3D Rendering/Render Farms—it’s a sickness, honestly), I’m likely going to need to either add another switch or upgrade this one. But for now, having that extra isolation between my production gear and my play gear is a massive win for reliability.
So, now we have the backbone and the distribution sorted; let’s have a look at some of the endpoints we’ll be adding to the network.
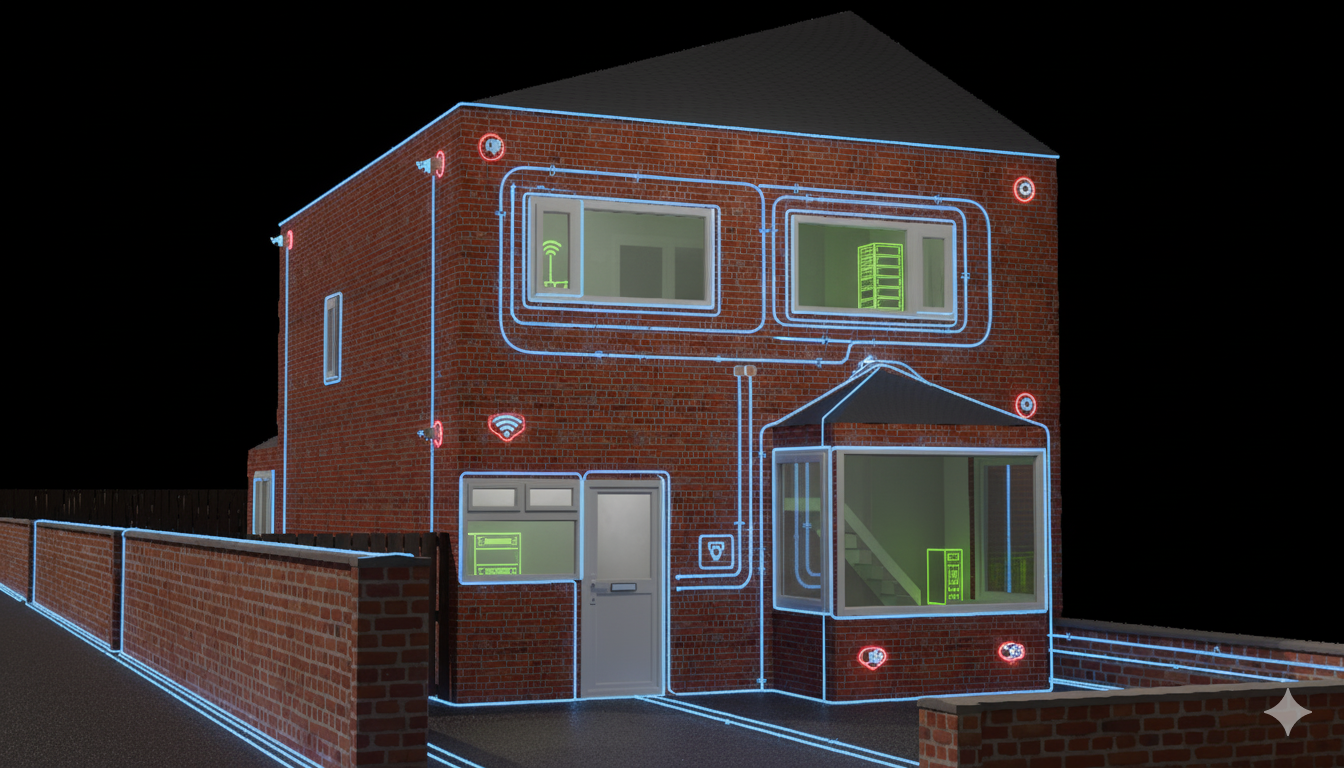
Phase 4: The Wireless and Security Overkill
1. The Brick Wall Conquerors: UniFi U7 Pro XG WAPs (£190.80)
These may be a bit overkill for most homes, but every internal wall on every house on this street has been built with brick that’s around 30-50mm thick, which is not great for Wi-Fi signal. When you try to push a signal through three of those, it’s like shouting through a waterlogged mattress. Hence why practically every room that matters (or the adjacent ceiling space) has its own Wireless Access Point.
First, let’s look at our Wireless Access Points (WAPs). For these, I’ve gone with the UniFi U7 Pro XG (£190.80). These are ceiling-mounted, 6-stream WiFi 7 Access Points with 10/5/2.5/1 GbE support as standard.
The U7 Pro XG comes with a boatload of features that my little audio-obsessed heart can get behind:
- Wireless Meshing: For quick temporary fixes, though we’ll stick to wired backhaul wherever possible.
- Band Steering: Efficiently pushes 5GHz and 6GHz capable devices onto the less-cluttered, faster bands.
- Fast Roaming (802.11k/v/r): This is the crucial one. It means your phone or laptop smoothly switches from the office WAP to the living room WAP without you even noticing. No more dropped video calls when you wander to the kitchen for a brew!
- Guest Network Isolation: Keeps visitors away from my precious lab equipment.
It’s about reliable, seamless coverage. When Abi is streaming a box set and I’m downloading a 100GB LLM, neither of us should notice a flicker. That’s the dream.
2. The Vigilant Eyes: UniFi G5 Turret Ultras (£94.80)
Next, let’s move onto the cameras. All of the cameras around the house will be UniFi G5 Turret Ultras (£94.80). They are ultra-compact, tamper-resistant, and weatherproof 2K HD PoE cameras with long-range night vision.
We’ve found that anything less than 2K is beyond useless if you actually need to see what is going on. I’ve seen enough fuzzy footage of a delivery driver’s back to know that detail matters. Ideally, 4K would be amazing, but… well, we’ll come to the storage implications and cost of that later. The 2K resolution is a great middle ground.
The G5 Turret Ultras come packed with smart features that make them truly useful, not just recording boxes:
- Person, Vehicle, and Motion Detection: No more alerts every time a leaf blows across the lawn. It just knows.
- Smoke/CO Alarm Detection: On camera with the built-in microphone, the camera can detect the sound of a standard smoke alarm and send an alert. That’s a seriously brilliant, low-tech way to add an extra layer of safety.
- IP66 Rated & IK04 Tamper Proof: They can handle a British winter and any mildly aggressive squirrel (or person, for that matter).
- PoE Powered: No additional power cables to worry about, just the single Ethernet cable providing both data and power. Clean and simple.
Even better, I’ll be able to link these into my Home Assistant install to help with automations, like turning on specific lights if motion is detected in the garden after dark. But I think that is a deep-dive project for another post entirely.
3. The Welcome Mat: G4 Doorbell Pro PoE Kit (£360)
Next up, we have another, kind of, camera in the G4 Doorbell Pro PoE Kit (£360). It comes with a 5MP (HD) Camera, built-in microphone, IR Night Vision, an NFC Reader, a little display, a speaker, and a fingerprint sensor, and it is connected to the network via PoE.
Whilst it’s not got the same 2K specs as the other cameras (it’s mainly focused on vertical field of view, so you can see packages), this is a nice simple way of seeing who is at the door and maybe adding a few extra security features to our home over time, such as smart locks and things, without changing the doorbell. The NFC and Fingerprint features are particularly tantalising, offering a potential gateway (pun intended!) into UniFi Access if my project-obsessed brain ever decides to go down the path of smart door locks. For now, it’s a beautifully simple, robust doorbell that is wired and reliable.
Phase 5: Data, Drives, and Digital Hoarding
Now, all this surveillance needs a proper home. I mean, we can’t just record hours of high-definition footage of Abi pottering around the kitchen and then save it to a dodgy USB stick plugged into the router, can we? That’s asking for trouble!
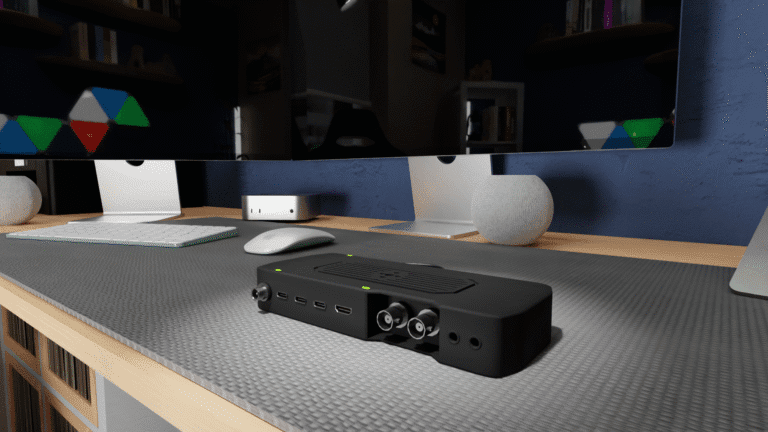
1. The Footage Vault: UniFi Network Video Recorder (UNVR) (£286.80)
To keep all of these cameras in line and record all of the footage without taking up a dedicated computer, we are going to need a Network Video Recorder (or NVR). Ubiquiti have the UniFi Network Video Recorder (£286.80).
The reason I went with this rather than say the smaller UNVR Instant is due to the camera count limitations. With this setup, I would have 12 2K cameras plus the HD Doorbell. The UNVR supports 20+ HD cameras, so it has plenty of headroom.
The UNVR also has a 10GbE SFP+ Port, so we can plug it directly into our Aggregation Switch, making sure the network isn’t clogged with high-resolution video streams. It also has four 3.5” drive bays, allowing for massive storage capacity and, more importantly, the ability to run drives in a RAID configuration. This is non-negotiable. If one drive fails (and they always fail eventually), the data is safe on the others. No footage lost.
Storage Maths (A fun bit of exaggeration):
- If I use 4 x 24TB drives: I can record all of the cameras for up to 112 days. (Over three months of continuous footage of my front door!)
- 74 Days with 4 x 16TB Drives.
- 37 Days with 4 x 8TB Drives.
- 4 Days with 4 x 1TB Drives.
Let’s be honest, 112 days is probably plenty of footage of us getting in the car to go shopping, but it’s nice to know I have the option. We’ll probably aim for the 8TB or 16TB setup, using proper NAS-rated drives (like WD Red Pro or Seagate IronWolf) designed for 24/7 writing, as opposed to cheaper desktop drives that will fail the second I look at them funny.
2. The Local Media Server: UNAS 4 (£360)
The last thing that I’ll be adding to this setup, for now at least, is the UNAS 4 (£360). It’s a 4-Bay Network Attached Storage device powered over PoE. It has 4x 2.5/3.5″ HDD bays and 2x M.2 NVMe SSD cache slots, 2.5 GbE networking, USB-C connectivity, and an included PoE+++ adapter, all in a compact footprint. It’s powered by a Quad-Core ARM® Cortex®-A55 at 1.7 GHz—not a powerhouse, but perfect for simple file serving.
This will allow me, once again, to have stuff stored on my network rather than on individual devices or relying on cloud storage, as I have been since my last NAS decided it didn’t like its firmware anymore and bricked itself. A brief moment of silence, please, for the fallen WD My Cloud. It was a tragedy, exacerbated by the fact that it happened right when WD discontinued their cloud access to the NAS, and the update was meant to just disable that feature rather than take out the whole machine. To say I’m not best pleased is an understatement, and it’s why I’ve embraced the local, self-hosted, no-cloud-required model ever since, well except for the absolutely massive files which I have to store on the cloud… for now at least.
The UNAS 4 is perfect for:
- Centralised Backups: Time Machine for my Mac, file history for my Windows machine.
- Media Library: All those digital box sets and photos accessible by the Smart TV via the wired network.
- Homelab Storage: A place for ISOs and VM images.
The M.2 NVMe cache is a nice touch, too, allowing for lightning-fast access to frequently used files—think of it as a super-fast speed lane for the most popular data, giving the system a turbo boost without needing to upgrade the main drives.
3. The One-Woman Neighbourhood Watch: UniFi Protect Viewport (£190.80)
Another great thing with this NVR Setup is that Ubiquiti also offer a UniFi Protect Viewport (£190.80). It’s a little pebbly-shaped thing with a PoE port and a HDMI port on one end and a pass through ethernet port on the other, and it lets you view your cameras in real-time on any TV.
Which is great for the one-woman neighbourhood watch that I am married to. Abi can see all the camera feeds on the big screen without me having to fiddle with an app or navigate a complex interface. It’s the ultimate simple solution. Even better is that I don’t have to take up another port on my switch in the living room as it has a network port to passthrough to the TV too. Brilliant! It’s tech that is so simple, even a tech-phobe would use it.
Phase 6: The Missing Link – A Simple Application Server
So that’s my grand plan for Unifing our new home when we are eventually able to buy it. The entire setup is robust, fast, and, yes, completely over-the-top.
But there is one thing missing. One little piece of the puzzle that my server-admin brain desperately craves: an Application Server like back in the good old days.
I really would like a simple-to-use rack-mounted box that just works and is controllable from the UniFi interface. That way, I can move a lot of my projects from my Mac over to some dedicated hardware, in a rack, out of the way in a cupboard under the stairs, where they belong.
Think of it as the ultimate utility player. I could run:
- Home Assistant OS: Giving my smart home automations the stability they deserve.
- Plex Server: A dedicated media server that can transcode (convert) video on the fly without bogging down my main computers.
- Docker Containers: A simple, low-power spot for me to run my AI/LLM experiments and rendering jobs without having to use my main desktop.
Ubiquiti does the Cloud Gateway, which is great, but it’s only for network control. They do the NVR for video. They do the NAS for files. What they need is a box that acts as a simple, high-speed, UniFi-controlled compute engine. I want the Single Pane of Glass experience—one interface (the UniFi controller) to manage the network, the cameras, the files, and the dedicated home lab projects. That would be the actual definition of pure gold.
For now, I’ll probably see if I can get my hand on another M Series Mac Mini 2nd hand and shove it into the rack, but having a UniFi-branded, 10GbE-linked box that just shows up in the UniFi controller as ‘Home Lab Server’ would truly complete my slightly obsessive vision. It’s the final, perfect cherry on this ridiculously overpowered cake.
Phase 7: The Final Tally and the Phased Rollout Reality
So that’s the grand plan. It may have to happen bit by bit because this whole tech bundle would set me back around (gets out spreadsheet… sighs) £5,652.
The majority of that is on the cameras, Access Points, and Switches, which are the non-negotiable foundation. To make this terrifying number a little more palatable for Abi (and for my savings account), it clearly has to be a phased rollout. The Cloud Gateway Fibre, a Wireless Access Point for each floor, a camera for the kids room and one for the front and back gardens with a switch upstairs and one down stairs connected via fibre should get us started. Then over time we’ll add in the doorbell and other coverage adding the aggregation and other switches as needed. then finally once these are built out we’ll add the remaining gear a bit at a time with the NVR first, then the NAS and finally the Viewport as a nice to have. It’s less of a massive financial blow and more of a persistent, low-grade tech expenditure, which is much easier to sneak past the budget spreadsheet.
A new house deserves a new, slightly insane, network that can handle everything from 8K streaming to my inevitable failed attempts at running a tiny AI model on an old GPU. I’ll be sure to review each bit of kit when I get them, but what a way to start a new chapter, right? I’m sure now that we have the 3D model a few other ideas may come to mind like removing walls and changing the layout of down stairs, fitting a new kitchen and bathroom or Pulling up the garden. All things I’m sure I will bore you with when the time comes.
I know this network plan is over the top but what are your thoughts? Have you had issues with WiFi Coverage? If so what were your solutions? what do you think I’m missing from my network stack? Let me know in the comment of the post that brought you here.